The attics must be well insulated to protect you from the great summer heat and save on winter heating. The empty volume represented by the attics is also a source of noise. Good insulation also helps limit the resonance phenomenon and offers excellent acoustic protection. Attic insulation is essential to ensure thermal and acoustic comfort and to save energy. You can do it yourself by following some basic rules. On planks or beams, from installing the vapour barrier to laying the rock wool, follow our step-by-step!
Attic insulation, what is it for?
Like the roof, the attic’s insulation optimally regulates heat exchanges with the outside. Attic insulation brings other exciting advantages:
- Lower costs on the bill: thanks to the control of heat dispersion, it is possible to keep our heating and cooling systems at lower levels, with consequent savings in energy and economic terms;
- Preserves healthiness: insulating the attic guarantees better air quality inside the home, with less humid and more comfortable environments;
- Improves living comfort: thanks to better air quality and, above all, the maintenance of a more adequate temperature, the overall quality of life in the environment increases;
- Insulates from external noise;
- Offers more excellent protection in case of fire;
- It reduces CO2 emissions, thus preserving the underlying environment;
- It increases the value of the property, allowing the reference energy bracket to be improved.
Cost, Time, and Required Tools
To cover a 60 by 40 square feet area of the attic with insulation of rating R-19 usually costs $2000-$2500.
The time depends on the complexity of your attic, insulation material and skill level. On average, the time to install insulation is 3-5 days.
You will need the following tools:
– Utility knife
– Utility knife blades
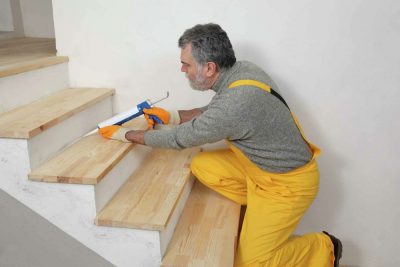
– Caulking gun
– Shop vacuum with HEPA filter
– Cordless drill
– Staple gun
– Tape measure
– Flashlight
– Work light
– Ladder
– Breathing protection
– Eye protection
– Glove
Prepare for the attic installation
Before you begin the installation, you must cover the pre-installation steps for an effective result. All the prerequisites are described below.
Energy Audit
Energy requirements, productions and consumption, vents, the structure of the house, and leakages provide the complete energy profile that helps to select the insulation material and R-value. Therefore you must do an energy audit. You can do this by yourself or by hiring a professional.
Professional Energy Audit
A professional audit includes scanning tools to detect doors, furnaces, leakages, infrared cameras and blower tests to generate an energy profile. It will cost you around $400-$600
Personal Energy Energy Audit
If you are tight on the budget, you can do a visual audit yourself. Follow these DIY steps:
- Check the attic door insulation on top side
- Check the access side door insulation and weatherstripping insulation
- Look for expanding wool, foam or insulation material from the pipes and ducts
- If any of these is not insulated properly, make sure to insulate
This audit lets you know about the weak and energy efficient-deficient parts.
Clean the Area
Clean space improves installation efficiency and avoids unwanted hindrances. Therefore, clean the room entirely and meticulously. There must no longer be any bulky objects or dust. With a broom or construction vacuum cleaner, carefully remove the dust. The edge of the surface to be insulated must be clean and dry up to a height of at least fifteen centimetres.
Measurements
Also, measure the attic’s height, width, and diagonals. With these, you will be able to calculate the number of crosspieces and uprights to install, tie rods to screw, and the surface area of the rock wool (therefore, the number of rolls or panels).
Structural Inspection
The first step is to identify any traces of humidity. Above all, you must only start laying the insulating material if the roof or walls are entirely airtight. If the roofing is damaged or the masonry has leaks, contact a roof maintenance specialist to resolve the problem.
In this step, you should also consider whether or not the attic is strong enough to hold one person’s weight and provide enough mobility to install insulation. The perimeter support, the mortar joints, and the lime must not be powdery or crumbly but must ensure good sealant adhesion or waterproof glue. Scrape it with a wire brush to roughen it up and clean the floor.
Supply Purchase
Next, you need to prepare the purchase of supplies. Accurately measure the space between the rafters, the rafters themselves, and the depth to the roof. This will allow you to purchase rolls or insulating panels of the right thickness, installation will be more accessible, and you will save precious time.
Note: If this operation produces a lot of dust, wet the support with a nebuliser and water. Before moving on to the next step, wait until it is scorched.
Installation Steps
1.Install the vapour barrier
Now that the surface to be insulated is clean and dry and the perimeter supports have been cleaned, you can begin installing the vapour barrier.
The vapour barrier is a membrane that guarantees a perfect vapour seal between the surface to be insulated and the insulating material: it prevents the passage of vapour, which, rising from the house, could deteriorate the rock wool.
Install the vapour barrier in the attic
- Unroll a strip of vapour barrier on the floor, running it up about fifteen centimetres onto the walls or perimeter supports. Be careful to fold the membrane well at the corners.
- Then, arrange the next strips, overlapping them by about ten centimetres.
- Once you have covered the entire surface with the vapour barrier, seal the strips with the adhesive. Use specific adhesive tape for sealing joints to prevent them from coming loose over time or due to humidity.
- As you glue it, smooth it with your hand so that no creases or air bubbles form.
- Once all the strips are joined, you must waterproof the perimeter support. To do this, you must create a generous bead (8 to 10 mm thick) of sealant or waterproofing glue, a maximum of 5 cm from the floor. Insist carefully on the corners.
Now, you must fix the vapour barrier by pressing lightly but without completely crushing the sealant or glue bead. No creases or air bubbles should exist between the vapour barrier and the glue.
Installation of the vapour barrier on the extra-thick beams
If there are beams rather than planks on the extrados of your attic, the vapour barrier installation is different. The vapour barrier strips must be laid parallel to the beams.
- Lay the first strip of a vapour barrier between the perimeter support and the first beam, making it go up the wall for about fifteen centimetres.
- Mark the crease well along the beam and cover it.
- Continue laying the strips, overlapping them by about ten centimetres. Pay attention to the fact that the overlap should be done on the floor, not on a beam. If necessary, increase the overlap to improve the seal.
- Insist well on each fold, at the base, and around the beams to insert the vapour barrier as profoundly as possible. If the vapour barrier doesn’t fit nicely over the rafters, you can secure it with staples. To ensure that the membrane does not tear at the staples, cover them with a small piece of adhesive tape for sealing joints.
- Seal the entire vapour barrier with sealing tape. There should be no creases or air bubbles under the sticker.
- Now that you have correctly sealed all the strips proceed with the perimeter sealing (the procedure to follow is the same as if the floor were a plank).
2. Lay the rock wool on the attic
- Generally, a 300 mm thick rock wool is suitable for any type of construction and guarantees excellent insulation. However, as long as the attic floor supports the weight, you can double this thickness by layering two layers of wool.
- First, choose rock wool coated with kraft paper on one side. Apart from the vapour barrier, this will make it harder for vapour to penetrate the insulating material. Once you have opened the rock wool, let it swell well in rolls or panels. You can shake it slightly to help restore its thickness.
- The rock wool must be laid with the kraft paper side facing the vapour barrier. Unroll or lay the panels to form the first strip of wool across the entire width of the attic. If it is necessary to cut it, take measurements and add 2 cm before cutting the wool with a sarac or with the appropriate knife for mineral wool.
- To cut it, place a board on the floor to avoid damaging the vapour barrier. No accessible space must be left between the wool and the perimeter support. Continue installing the subsequent strips, crossing the cuts to cover the entire attic surface. For more extraordinary performance, you can add a second layer of rock wool on top of the first, crisscrossing the strips.
3. Lay the rock wool on the extra-thick beams
The rock wool is laid slightly differently if beams are on the attic’s extrados. It is preferable to lay two layers of wool between the beams and the second above to cover the entire attic surface.
- For the first layer, choose wool panels that are as close as possible to the space between the beams and the height of the beams. In this way, the installation will be easier since the cuts will be limited.
- Lay the panels between one beam and another without leaving space between the rock wool and the perimeter support or between the wool and the beams.
- Fill all the spaces between the beams. Next, lay the second layer of rock wool perpendicular to the beams.
- Cover the entire attic surface.
4. Insufflating some glass wool with the blowing machine.
Insufflating glass wool, rock wool, or cellulose wadding with a blowing machine into non-habitable attics is an increasingly common, cheaper, and faster solution. The insulation coefficient is obtainable depending on the thickness of the wool or wadding to be blown in. Finally, consider that it is possible to rent a blowing machine, that the length of the tubes can reach several tens of meters, and that the wool or wadding to be blown is sold in bags of 15 to 20 kg.
What is the best insulation for the attic?
There are numerous insulating materials for insulating the attic. Each of these materials has particular characteristics, advantages, and disadvantages. These materials differ in mechanical resistance, waterproofing, breathability, resistance to time, Soundproofing, and thermal stability.
Let’s see the main ones:
1. Rock wool
The first material worthy of note is undoubtedly rock wool, a material deriving from a mixture of rocks that offers excellent heat-insulating, sound-absorbing, and fire-retardant properties (in the case of wooden roofs and attics).
Rock mineral wool is undoubtedly one of the best-performing insulating materials. On an economic level, it is accessible and the costs vary depending on the format and thickness, between $10-20 /m2.
2. Wood fiber
It is one of the most used eco-materials in construction. It is a product of plant origin, wholly recyclable and biocompatible, as it derives from wood processing waste.
It is an exceptionally light material, easily transportable, with thermal and acoustic insulating properties. However, less effective against fire. Costs fluctuate between $2.5 and $20 /m2.
3. Cork
It is a material that needs no introduction and has excellent thermal and acoustic insulating characteristics: it is waterproof and breathable simultaneously. Thanks to its shape, it allows external humidity to be repelled and simultaneously lets the internal humidity of the home escape.
In this case, the price varies from $7 to $ 50 /m2. It is higher than other solutions but is depreciable thanks to its outstanding durability over time.
4. Expanded polyurethane
Expanded polyurethane is a synthetic material that boasts good thermal and compressive resistance. Its advantages are its adaptability to any surface and the speed of installation (it can be sprayed on the surfaces to be insulated).
One of the weak points of this material is its inability to offer protection in the event of a fire. Prices are similar to other solutions, usually around $ 3-10/m2. However, there are more expensive solutions, which can reach $20/m2.
You can choose the proper material that you like and require. However, make sure that you consider safety, breathability and comfort level.
Safety Instructions
Installing insulation is a long process that requires physical agility and basic skills. It is necessary to keep the following safety instructions in mind.
- Use breathing equipment
- Fully covered suit that has long sleeves, gloves, and goggles to protect you from chemicals
- Wear a stiff hat or helmet to avoid injury from sharp tools falling from above
- Move around slowly and carefully to avoid falling
Attic installation is a process that costs $2000 to $2500 and long hours of working. You can choose any of the insulation materials listed above according to your comfort and energy profile. For an effect insulation, follow all the steps and safety instructions.